

How to build a complete blog with NextJS(React JS) and contentful CMS(Part 2).


Introduction.
CMS platforms are powerful options that help front-end developers build amazing products and services without even a single line of backend code. This article is the second part of a 2-part build-article series that involves building an amazing blog using one of such awesome CMS platforms called ** Contentful **.
Follow this link to see the previous article
Also, Just in case you encounter any errors while following along, please do well to patiently debug so as to get a fix. Consulting other contents that are related to this topic, will also do much good.
I might probably miss a thing or two while proceeding.
In the previous article, we had a long ride with the introduction and successfully building the front-end of our blog.
If you’re a front-end web developer who is seeking a CMS solution that offers so many superpowers with an API-first approach, then this build is for you.
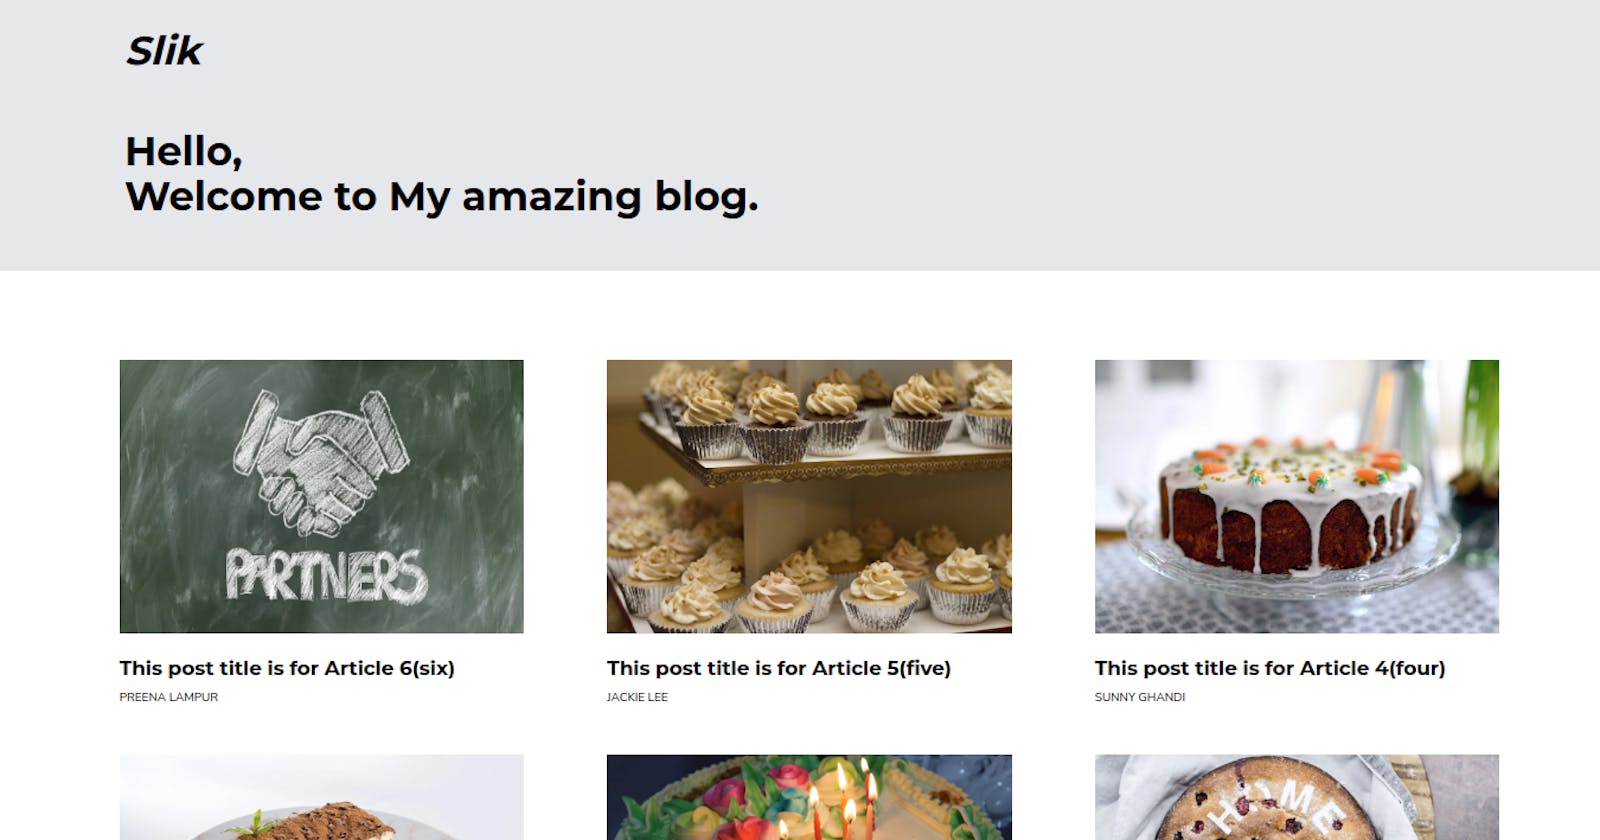
The banner of the previous post is the screenshot of how the final look of the blog was after the build in the previous article. The banner of this post is now how our completed project looks.
In this article, we’ll be finishing the project by completing every necessary step, and successfully fetching our uploaded data from contentful using their content delivery API.
For me, ** Contentful ** is the best CMS platform in the current CMS market. Creating and customizing data on contentful is very developer/user friendly. It comes with so many options to help developers build products and services that are feature rich.
One other thing that I love about using contentful, is that data fetching is done using the content-delivery API, hence fetching your data from contentful is as interesting as using any other product API.
Despite the availability of such a better option, It still seems most developers are not aware (that such an API approach is available on contentful) because in all the tutorials I watched, data was only fetched using contentful’s CLI tool (Maybe I simply didn’t notice though).
I wanted a better way, I just wanted to have that “better” developer experience that came with using regular APIs. Luckily, I found out that this was possible thanks to my digging into the contentful API reference on the developer docs.
Contentful has just got so much to offer.
Let’s ride on with our build, we’ll get to see and explore the many awesomeness of contentful that this build has got to show us – mind you, there’s even so much more.
Pre-rendering our blog’s dynamic pages (SSG).
In case you can’t wait to explore/see what our final blog looks like, just hang on till the end of the article, you find a link to the live project.
This blog is built with NextJs, and pre-rendering is done using NextJs’ static-site-generation(SSG).
SSG is a technique that gives dynamic pages the ability to render at the speed of static - thanks to pre-rendering. This method is very ideal for blog projects that do not experience frequent uploads.
I’ll be starting a project on the different pre-rendering techniques available in NextJS soon. Don’t forget to click the follow button, just so you don’t miss out on all the awesome content that will be on the project.
Creating and adding data to contentful.
Now, we’re going to walk through the process of adding our data to contentful. Later on, we’ll use the generated (content delivery) API to fetch our data into our blog.
First, you need to create a contentful account. Contentful accounts work with “SPACES”. You can have different spaces in your contentful account. However, Contentful only provides one free space for community builds. You can use this free space to build your stuff until you need a higher plan.
Adding data to contentful starts with creating “CONTENT MODELS”. Content models as the name implies, are simply models or data categories. Content modeling is simply a method of structuring how a particular data category will look.
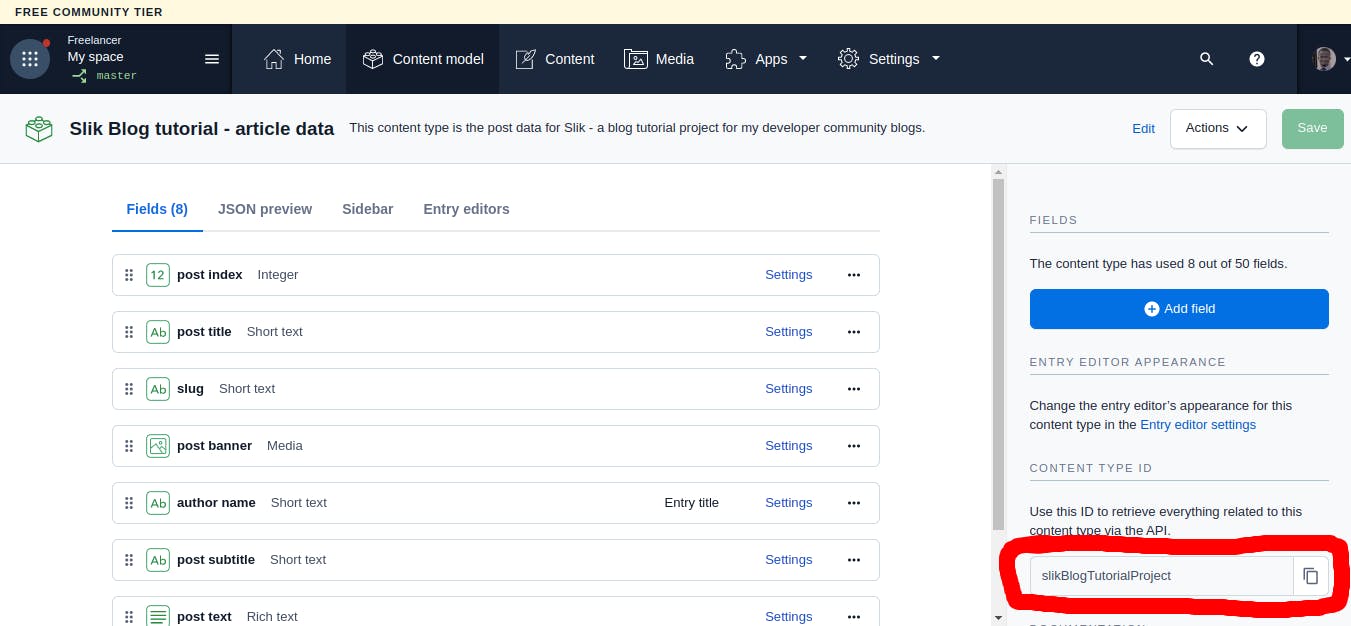
Below are two screenshots of the available content models on my contentful account. The first shows the two content models that I currently have on my free contentful space, and the next shows the structure of the second content model which is the data for this project. The screenshots should give you an idea of how content models and content types work in contentful.


Now go ahead, and create a content model, then add the various data fields and data into it.
post data model.
  {
    postIndex: 1,
    projectId: 'slik',
    postBanner: 'upload-image',
    authorName: 'Sam Matthews',
    slug: 'This-post-title-is-for-Article-1(one)',
    postTitle: 'This post title is for Article 1(one)',
    PostSubtitle: 'A follow up to the title of Article 1(one)',
    postText:
      'Just add any long dummy text',
  }

  {
    postIndex: 2,
    projectId: 'slik',
    postBanner: 'upload-image',
    authorName: 'Sarah Stewards',
    slug: 'This-post-title-is-for-Article-2(two)',
    postTitle: 'This post title is for Article 2(two)',
    PostSubtitle: 'A follow up to the title of Article 2(two)',
    postText:
      'Just add any long dummy text',
  }

  {
    postIndex: 3,
    projectId: 'slik',
    postBanner: 'upload-image',
    authorName: 'Karim Ham',
    slug: 'This-post-title-is-for-Article-3(three)',
    postTitle: 'This post title is for Article 3(three)',
    PostSubtitle: 'A follow up to the title of Article 3(three)',
    postText:
      'Just add any long dummy text',
  }

  {
    postIndex: 4,
    projectId: 'slik',
    postBanner: 'upload-image',
    authorName: 'Sunny Ghandi',
    slug: 'This-post-title-is-for-Article-4(four)',
    postTitle: 'This post title is for Article 4(four)',
    PostSubtitle: 'A follow up to the title of Article 4(four)',
    postText:
      'Just add any long dummy text',
  }

  {
    postIndex: 5,
    projectId: 'slik',
    postBanner: 'upload-image',
    authorName: 'Jackie Lee',
    slug: 'This-post-title-is-for-Article-5(five)',
    postTitle: 'This post title is for Article 5(five)',
    PostSubtitle: 'A follow up to the title of Article 5(five)',
    postText:
      'Just add any long dummy text',
  }

  {
    postIndex: 6,
    projectId: 'slik',
    postBanner: 'upload-image',
    authorName: 'Preena Lampur',
    slug: 'This-post-title-is-for-Article-6(six)',
    postTitle: 'This post title is for Article 6(six)',
    PostSubtitle: 'A follow up to the title of Article 6(six)',
    postText:
      'Just add any long dummy text',
  }
Image data model
const slikImageData = [
  {
    // use this same data for all the images

    Title: 'slik-blog-project-asset',
    Description: 'post-banner',
    File: 'add image here',

   /* note that the name of each image should match the postIndex as shown in the
    post data model.
    If postIndex is 1, then save the image with something like 1.jpg. This is
    not a contentful rule, but just another hack to help me query and get the data
    as I want them */
  },
];
Ensure to add the data as I created them, it took me some going around before I could grasp how to model my data well enough to be able to query and fetch them as I wanted.
After this tutorial, you can go ahead on your own to explore contentful’s database to further grasp how to properly structure your data to suit the needs of your project.
Exploring contentful’s developer docs API reference.
Now, Here’s one part I love.
In most(maybe even all) of all the tutorials I came across, data fetching was done with Contentful’s CLI tool.
To me, CLI (command line interface) tools, create a poor developer experience. It’s like needing to learn how to use a new technology that comes with using a platform(contentful in this case).
While contentful provides a CLI approach, it also provides a direct API approach. With the direct API approach, you can just go ahead, generate an API using your credentials, and simply make calls to fetch your data using Javascript’s built-in fetch API. I haven’t tried out axios yet, but I believe it should work just seamlessly as well.
The API reference on contentful’s developer docs makes it even more enjoyable with its predefined API model.
All you need to do is to replace the credentials on the reference with your original ones, add the parent/prefix URL to it, and then make calls to fetch your data.
I prefer this pattern more because it doesn’t require learning how to get along with the CLI tool. You just get to enjoy the seamless developer experience that comes with the regular ways of fetching data. I believe this is where contentful stands out among other CMS platforms
To generate your API, you’ll need 4 parameters.
Your contentful product ID.
Your contentful access token.
Your contentful environment(the default environment is “master” – use the default if you haven’t set any environments yet).
The ID of the content type you wish to fetch.
The fourth(content type ID) parameter is not compulsory if you are creating a content model for the first time, but it is important as you begin to create more content models and content types.
Without adding the fourth parameter, you will be fetching all the content types available on your contentful account. The content type ID helps you query and fetch only the particular entry(content type) you want at any given time.
You can go ahead to fetch them all if you wish, then filter out the content type you want in your code.
After generating your API, it should follow this pattern for fetching all the different data entries.
const url = `https://cdn.contentful.com/spaces/${spaceId}/environments/${environment}/entries?access_token=${accessToken}`
and like this for fetching only a selected type of entry.
const url = `https://cdn.contentful.com/spaces/${spaceId}/environments/${environment}/entries?access_token=${accessToken}&content_type=slikBlogTutorialProject`
You will notice that I used both methods as shown in the codes below. You can use whichever approach you prefer.
The screenshot below shows how to get your specific content type ID.
Now try running your API in the browser or in postman to see the result.
Check out the youtube video below, to learn how more about building stuffs with contentful. This video is a tutorial by John Smilga. Although he used the CLI approach which I do not recommend, He did a great job in revealing how to get along on Contentful’s website. Even though the video is kind of old, it still has a lot of value.
Hiding our API credentials.
We’re going to make use of a “.env” file to hide our API credentials. In the root of your app, create a new file named “.env”. Then add the following into it but with your own credentials in this case.
.env file
MY_CONTENTFUL_SPACE_ID=addYours
MY_CONTENTFUL_ACCESS_TOKEN=addYours
MY_CONTENTFUL_ENVIRONMENT=master
Adding our data into our blog app.
Now that we have our API up and done, let's begin fetching data and populating our app.
As stated earlier, the blog is built with NextJs, and pre-rendering is done using NextJs’ static-site-generation(SSG).
Now we’ll be fetching and rendering our data in both pages – the landing page, and the post page.
We’ll use the “getStaticProps” method for the landing page to fetch data that will be added to our postcards.
The Landing page, is not a dynamic page, so that will be much about it.
landing page code.
import React from 'react';
import Hero from '../components/home-page-components/Hero';
import PostWrapper from '../components/home-page-components/PostWrapper';
import MainAppLayout from '../components/layout-components/MainAppLayout';

function Index({ data }) {
  return (
    <MainAppLayout>
      <Hero />
      <PostWrapper data={data} />
    </MainAppLayout>
  );
}

export default Index;

export async function getStaticProps() {
  const spaceId = process.env.MY_CONTENTFUL_SPACE_ID;
  const accessToken = process.env.MY_CONTENTFUL_ACCESS_TOKEN;
  const environment = process.env.MY_CONTENTFUL_ENVIRONMENT;


// This API directly fetches only the data/content types relevant to this project.
  const url = `https://cdn.contentful.com/spaces/${spaceId}/environments/${environment}/entries?access_token=${accessToken}&content_type=slikBlogTutorialProject`;
  const response = await fetch(url);
  const data = await response.json();

  return {
    props: {
      data,
    },
  };
}
However, the post page is not static since it is a dynamically created page that is generated for every article/post. As a result, we’ll be using both the “getStaticProps” method and the “getStaticPaths” method as shown below.
post page code.
import React from 'react';
import MainAppLayout from '../../../components/layout-components/MainAppLayout';
import PostIntro from '../../../components/post-page-components/PostIntro';
import PostNav from '../../../components/post-page-components/PostNav';
import PostText from '../../../components/post-page-components/PostText';

function ArticlePostPage({ data, params }) {
  const slikBlogData = data.items.filter((each) => {
    return each.fields.projectId === 'slik';
  });

  const postCardsData = slikBlogData.map((each) => {
    return each.fields;
  });

  const currentPost = postCardsData.filter(
    (currentPost) => currentPost.slug === params.articleId
  );

  return (
    <>
      <PostNav />
      <MainAppLayout>
        <div className='w-full sm:w-4/5 lg:w-3/5 mx-auto sm:pt-12'>
          <PostIntro currentPost={currentPost} data={data} />
          <PostText currentPost={currentPost} />
        </div>
      </MainAppLayout>
    </>
  );
}

export default ArticlePostPage;

export async function getStaticPaths() {
  const spaceId = process.env.MY_CONTENTFUL_SPACE_ID;
  const accessToken = process.env.MY_CONTENTFUL_ACCESS_TOKEN;
  const environment = process.env.MY_CONTENTFUL_ENVIRONMENT;


/* This API fetches all data types on my contentful account. which I'll later filter to get only the relevant ones for this project. */
  const response = await fetch(
    `https://cdn.contentful.com/spaces/${spaceId}/environments/${environment}/entries?access_token=${accessToken}`
  );
  const data = await response.json();

  const slikBlogData = data.items.filter((each) => {
    return each.fields.projectId === 'slik';
  });

  const postCardsData = slikBlogData.map((each) => {
    return each.fields;
  });

  const paths = postCardsData.map((currentPost) => {
    return {
      params: { articleId: `${currentPost.slug}` },
    };
  });

  return {
    paths,
    fallback: false,
  };
}

export async function getStaticProps(context) {
  const spaceId = process.env.MY_CONTENTFUL_SPACE_ID;
  const accessToken = process.env.MY_CONTENTFUL_ACCESS_TOKEN;
  const environment = process.env.MY_CONTENTFUL_ENVIRONMENT;

  const { params } = context;

 const url = `https://cdn.contentful.com/spaces/${spaceId}/environments/${environment}/entries?access_token=${accessToken}`;

/* This API fetches all data types on my contentful account. which I'll later filter to get only the relevant ones for this project. */
  const response = await fetch(url);
  const data = await response.json();

  return {
    props: {
      data,
      params,
    },
  };
}
The “getStaticProps” method does our data fetching and passes the fetched data as a prop to our app, while the “getStaticPaths” method dictates which page(s) will be pre-rendered in our app. Since we want all available post pages to be pre-rendered, the code has been automated to pre-render all pages as shown above.
Project Repository.
This blog project(slik), is public, below is a link to the project repository. Here, you can find all everything about slik. For now, the repository contains two branches. One branch is for the local build with hard-coded data. The other is for our complete project built with data fetched from contentful.
** A lot more branches coming very shortly 🙂🙂🙂 **
I hope to scale this project(slik) into a massive open-source asset for learning about NextJS(ReactJS) and Contentful very soon. I believe you won’t want to miss out on that. Just click the follow button, and keep your fingers crossed in anticipation.
Hosting our project
The project is hosted live on vercel via github. As such, all that is needed to update our app is a simple push to github, and a successful build of our app run on vercel’s server.
Hosting an app on vercel is super easy. You can do that in less than 15 minutes as long as there is no build failure.
This tutorial shows how to host a site with environmental variables on vercel via a service like github.
While hosting your app, remember to add your hidden credentials(environmental variables) on vercel. If not, you app will experience a build failure.
Live project site.
Below is a link to the project hosted live on vercel.
Conclusion.
That is much about it guys. We’ve successfully built a complete blog without a single line of backend code. Ain’t that awesome?
If you’ve read up to this point, then I am super grateful.
If you’ve found the article very interesting, do drop your comments and reactions. I’ll be glad to see them, let’s engage in the comments area.
You can also follow me on social media. That will be awesome I guess. See the links below.
Thanks a lot for reading. See you shortly in the next article. Cheers!!!