How to build a complete/full-stack blog with NextJS(React JS) and contentful CMS.

Full-stack Developer . Blockchain/Web3 Developer . Technical Writer . Tech Tutor/Mentor . Startup Enthusiast . Founder/CTO @ The Zoe Collective
Introduction
One reason why I have always been passionate about becoming a full-stack developer is the ability to build products/services that are complete. Complete in the sense that they are fully functional – having both the client-side and server side functionalities.
The ability to build complete products and services thanks to the use of APIs, has been a relieving factor for me as a front-end developer. Even better now, is the availability of awesome platforms like firebase and its alternatives.
One other amazing innovation in the developer space for some time now is the rise of “headless” architecture.
Headless architecture is the innovation that enables developers to use CMS platforms like Strapi, Contentful, and Sanity. These platforms provide front-end developers the power to build awesome stuffs by bringing on the front-end that they've built using their favorite front-end web development tools to couple with remote data. The Headless architecture trend has even spread its tentacles and is being implemented in e-commerce nowadays. A very practical example is the adoption of headless e-commerce by e-commerce giant Shopify.
A user simply needs to set-up/configure/store the required data “elsewhere” Thanks to the CMS platform, while the front-end development is handled separately and then coupled with the data being provided afterward.
The possibility of being able to build sleek and amazing front-ends with tools of choice is just so amazing. CMS platforms provide great opportunities for front-end developers to build awesome stuffs that their use cases meet.
In this two-article series, I will walk you through the process of building a complete/full-stack blog with one of such CMS platforms – Contentful. This is the first Article in the series.
Also, Just in case you encounter any errors while following along, please do well to patiently debug so as to get a fix. Consulting other contents that are related to this topic, will also do much good.
I might probably miss a thing or two while proceeding.
Although there are other CMS options Like Strapi, and Sanity, I went with Contentful. The choice of which CMS platform to use is up to you.
This youtube video was helpful in helping me make my choice. You can check it out for yourself.
Do explore other content on the web, so you can learn more about all the CMS options, and know which one will best suit you.
More on what we’ll be building.
In this build tutorial series, we’ll be building an amazing blog with NextJS. We’ll be using Contentful CMS to manage our blog data, and we’ll also be using Tailwind CSS for styling.
In case you don’t know what NextJS is, It’s an awesome Javascript framework that is built on ReactJS. It is referred to as “the react framework for production” because it comes out of the box with amazing features like page/file-based routing, Image optimization, some awesome pre-rendering features like Server-side-rendering(SSR), and Incremental static regeneration(ISR), and other amazing goodies that provides a more production ready developer experience.
As for tailwind CSS, I believe it is the most amazing styling innovation to ever hit the front-end web development scene. Tailwind CSS affords developers the power to build sleek-looking websites with way less custom-CSS hassle. You just learn the available classes, then you call them in your HTML/JSX – It’s that easy especially if you've mastered Vanilla CSS earlier.
Tailwind CSS might seem awkward from a distance. I wasn’t a fan of it from the start as well, but right now, tailwind CSS is my first and best choice when it comes to styling web pages.
Let’s Jump into the build.
We’ll handle the development of the front end first. then we’ll configure our data models and add data contents on Contentful. Finally, We’ll then fetch our data using the provided API and display it on our blog using one of the awesome pre-rendering techniques provided by NextJS.
Naming our project.
Let’s give a name to our blog project – let’s call it “slik”.
Installing NextJs and Tailwind CSS.
Let’s install Next js and tailwind CSS using the single command installation option shown below
pnpm create next-app --example with-tailwindcss slik
I use PNPM package manager – PNPM is a newer package manager. It is a more performant variant of NPM. Its installation and use are both super-easy – Just install, then use instead of NPM. Simply use "PNPM" where ever you would normally have used NPM
Visit the official PNPM website for more details about PNPM.
Next, let’s remove every unnecessary file from our project. It seems NextJS now comes with out-of-the-box typescript support. We’ll be removing every typescript file since we’ll be using Javascript and not typescript. To be safe as you do so, create a trash folder in your project and move all the unwanted files into it.
Next, Let’s go ahead and configure colors and add some basic styles to our global tailwind css file.
Whenever I work with tailwind CSS on a project that requires me to create color themes(light and dark modes), I do all my color configurations for both light and dark modes in single CSS classes using the “@apply” directive, then I can call such classes where ever I want. This way, configuring colors for the project in the future will be a lot easier since all color configurations will be in one place.
Toggling the colors will then require a Javascript setup that simply toggles the “dark” class on the root “element of the project” – I’ll cover that in another article hopefully soon.
Just remember to click the “follow” button, so you don’t miss out on any of my future articles.
Even though we’re not creating dark and light modes in this project, I’ll still do color configurations in the “global.css” file. Let’s keep things in one place.
Adding styles
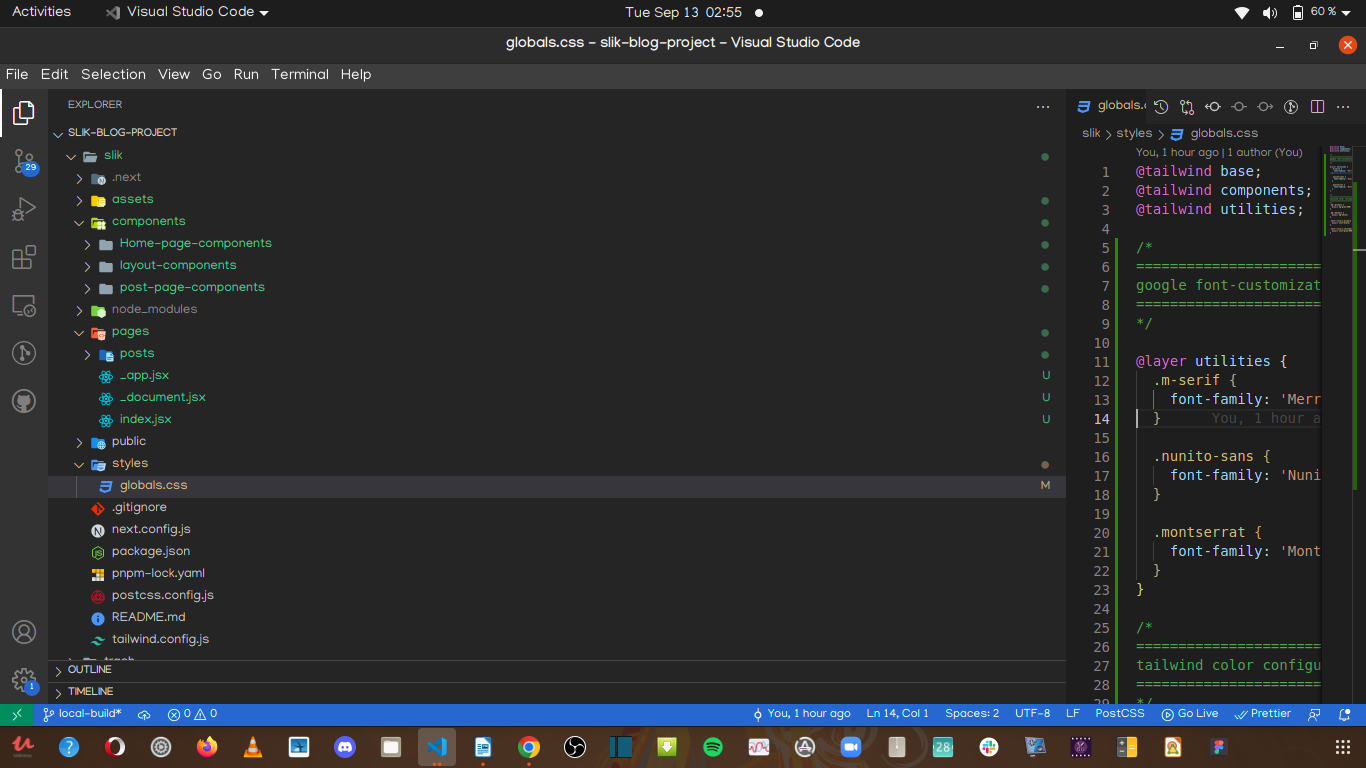
Our CSS file should look like this:
@tailwind base;
@tailwind components;
@tailwind utilities;

/*
============================
google font-customization
============================
*/

@layer utilities {
  .m-serif {
    font-family: 'Merriweather', serif;
  }

  .nunito-sans {
    font-family: 'Nunito Sans', sans-serif;
  }

  .montserrat {
    font-family: 'Montserrat', sans-serif;
  }
}

/*
================================
tailwind color configurations
================================
*/
.bg--primary {
  @apply bg-gray-200;
}

.bg--default {
  @apply bg-white;
}

.text--colors_primary {
  @apply text-black;
}

.text--colors_secondary {
  @apply text-gray-600;
}
Adding fonts
I've added Google fonts to the project using the "custom document" file already.
I used the “_document.jsx” file to add google fonts to our project. Check out NextJS docs, to learn why you should use it instead of importing fonts into your pages by individually using the Head component.
import { Head, Html, Main, NextScript } from 'next/document';

/* The NextJS docs recommend to avoid adding web fonts across pages in the individual
Head components but to do so in a single custom document instead. */

function Document() {
  return (
    <Html>
      <Head>
        <link rel='preconnect' href='https://fonts.googleapis.com' />
        <link
          rel='preconnect'
          href='https://fonts.gstatic.com'
          crossOrigin='true'
        />
        <link
          href='https://fonts.googleapis.com/css2?family=Merriweather:wght@300&family=Montserrat:wght@400;700&family=Nunito+Sans:wght@400;700&display=swap'
          rel='stylesheet'
        />
      </Head>
      <body>
        <Main />
        <NextScript />
      </body>
    </Html>
  );
}

export default Document;
You can read about the custom “Document” file using the link below:
https://nextjs.org/docs/basic-features/font-optimization#usage
Next, import the global tailwind CSS file into our project root (_app.jsx) file
import Head from 'next/head';
import '../styles/globals.css';

function App({ Component, pageProps }) {
  return (
    <>
      <Head>
        <title>Welcome to slik</title>
      </Head>

      <main className='bg--default'>
        <Component {...pageProps} />
      </main>
    </>
  );
}

export default App;
Now that we’ve added our NextJS app called slik, let's move into the app(slik) folder to run our app, Let’s also get to test out tailwind CSS to confirm that everything is properly installed. Run the command below to navigate to the app folder if you're not in it yet.
cd slik
and this to start our app in development mode.
pnpm run dev
Now everything should be in good shape. Let’s give our project a final setup for pages.
We’ll be having two pages(the main blog home page and the article page - which will be dynamic) and the relevant components.
Note that when working with NextJS, all components should live outside the pages folder.
We’re saving our files as "jsx" files not "js". It Doesn’t make much difference though. Just choose whichever you wish to save your files with.
Your project folder structure should hopefully look more like mine by now.
Creating pages and components
Now, lets get into the real deal of creating our pages and components.
Main blog home page.
import React from 'react';
import Hero from '../components/Home-page-components/Hero';
import PostWrapper from '../components/Home-page-components/PostWrapper';
import MainAppLayout from '../components/layout-components/MainAppLayout';
import postsData from '../assets/data/post-data';

function Index() {
  return (
    <MainAppLayout>
      <Hero />
      <PostWrapper postsData={postsData} />
    </MainAppLayout>
  );
}

export default Index;
I've already configured local data for building our app locally. For the post images, I used a single Image. We'll upload the main images and later get them fetch from contentful's cloud storage.
const postsData = [
  {
    postIndex: 1,
    projectId: 'slik',
    postBanner: 'upload-image',
    authorName: 'Sam Matthews',
    slug: 'This-post-title-is-for-Article-1(one)',
    postTitle: 'This post title is for Article 1(one)',
    PostSubtitle: 'A follow up to the title of Article 1(one)',
    postText:
      'This the post text for the first article. Article 1 is unique. Lorem, ipsum dolor sit amet consectetur adipisicing elit. Tempore nulla temporibus possimus',
  },
  {
    postIndex: 2,
    projectId: 'slik',
    postBanner: 'upload-image',
    authorName: 'Sarah Stewards',
    slug: 'This-post-title-is-for-Article-2(two)',
    postTitle: 'This post title is for Article 2(two)',
    PostSubtitle: 'A follow up to the title of Article 2(two)',
    postText:
      'This the post text for the second article. Article 2 is unique. Lorem, ipsum dolor sit amet consectetur adipisicing elit. Tempore nulla temporibus possimus',
  },
  {
    postIndex: 3,
    projectId: 'slik',
    postBanner: 'upload-image',
    authorName: 'Karim Ham',
    slug: 'This-post-title-is-for-Article-3(three)',
    postTitle: 'This post title is for Article 3(three)',
    PostSubtitle: 'A follow up to the title of Article 3(three)',
    postText:
      'This the post text for the third article. Article 3 is unique. Lorem, ipsum dolor sit amet consectetur adipisicing elit. Tempore nulla temporibus possimus',
  },
  {
    postIndex: 4,
    projectId: 'slik',
    postBanner: 'upload-image',
    authorName: 'Sunny Ghandi',
    slug: 'This-post-title-is-for-Article-4(four)',
    postTitle: 'This post title is for Article 4(four)',
    PostSubtitle: 'A follow up to the title of Article 4(four)',
    postText:
      'This the post text for the forth article. Article 4 is unique. Lorem, ipsum dolor sit amet consectetur adipisicing elit. Tempore nulla temporibus possimus',
  },
  {
    postIndex: 5,
    projectId: 'slik',
    postBanner: 'upload-image',
    authorName: 'Jackie Lee',
    slug: 'This-post-title-is-for-Article-5(five)',
    postTitle: 'This post title is for Article 5(five)',
    PostSubtitle: 'A follow up to the title of Article 5(five)',
    postText:
      'This the post text for the fifth article. Article 5 is unique. Lorem, ipsum dolor sit amet consectetur adipisicing elit. Tempore nulla temporibus possimus',
  },
  {
    postIndex: 6,
    projectId: 'slik',
    postBanner: 'upload-image',
    authorName: 'Preena Lampur',
    slug: 'This-post-title-is-for-Article-6(six)',
    postTitle: 'This post title is for Article 6(six)',
    PostSubtitle: 'A follow up to the title of Article 6(six)',
    postText:
      'This the post text for the sixth article. Article 6 is unique. Lorem, ipsum dolor sit amet consectetur adipisicing elit. Tempore nulla temporibus possimus',
  },
];

export default postsData;
Adding datasets
You can just copy out the data as pasted above so you can be on the safer side during adding the datasets to the cloud. It took me some going around, to understand Contentful's Database before coming up with those data sets.
** Our final blog should look like the main banner of this post. You can scroll back up to see how it looks. **
The article page
import React from 'react';
import MainAppLayout from '../../../components/layout-components/MainAppLayout';
import PostIntro from '../../../components/post-page-components/PostIntro';
import PostNav from '../../../components/post-page-components/PostNav';
import PostText from '../../../components/post-page-components/PostText';

function ArticlePostPage() {
  return (
    <>
      <PostNav />
      <MainAppLayout>
        <div className='w-full sm:w-4/5 lg:w-3/5 mx-auto sm:pt-12'>
          <PostIntro />
          <PostText />
        </div>
      </MainAppLayout>
    </>
  );
}

export default ArticlePostPage;
Below is a link to the GitHub repository for the project. You can check it out to see all the other components and files.
Conclusion
With this, we'll be ending this part of the series. In the Next article, We'll explore contentful, and get to see how to create Content models, and how to add our blog content to its cloud storage.
It's just so to amazing what Developers can do with Contentful. I am really amazed at how much this CMS has got to offer.
Next article.
In the next article, We'll get to fully see how a complete blog can be built using Contentful's content management APIs.
As a side note, this article my final submission in the hashnode 4articles4weeks writeathon.
I decided to make my final submission a very impressive one. That's why I took so much time to make this build tutorial. And that's why it's coming this late.
I hope you enjoyed the build. Don't forget to drop your comments and reactions.
I'll be glad to see them.
Thanks for reading through this article today.
Cheers!!! See you in the next build.


